How to use ACE in Angular

What is ACE?

As the homepage of ACE prompts, Ace is an embeddable code editor written in JavaScript. It matches the features and performance of native editors such as Sublime, Vim and TextMate. It can be easily embedded in any web page and JavaScript application. You can download and try at https://ace.c9.io/

How to use ACE editor in your Angular app

There are many ways that you can use ACE editor in your Angular app. You can directly download ACE and plug into your project or find a popular built-in angular module

I refer the second one because we shouldn’t reinvent the wheel and the popular built-in one should be used by many developers. So that, bugs must be fixed and the performance must be nice.

ng2-ace-editor is a good one. You can find this package from npm website

https://www.npmjs.com/package/ng2-ace-editor

From root folder of your project where the package.json is in

npm i ng2-ace-editor --save

In your module, import this editor module by add AceEditorModule in to imports section on @NgModule decorator

import { AceEditorModule } from 'ng2-ace-editor';
@NgModule({

    declarations: [

        ...

    ],

    imports: [

         ...

        AceEditorModule,

        ....

       )],

    providers: [],

    bootstrap: []

})

export class AppModule { }
The you can now use ace-editor component in your template file
<ace-editor theme="monokai" mode="javascript" style=" min-height: 150px; overflow: auto;" [formControlName]="'answer'+(num+1)"></ace-editor>
You may see the errors as below one after another. Your editor cannot work correctly
index.js:3802 GET http://localhost:4200/mode-javascript.js net::ERR_ABORTED 404 (Not Found)
After you try to fix the above then you get the followings
blob:http://localhost:4200/5522acb5-d008-4704-b802-99d0412dab23:1 Uncaught DOMException: Failed to execute 'importScripts' on 'WorkerGlobalScope': The script at 'http://localhost:4200/worker-javascript.js' failed to load.
at blob:http://localhost:4200/5522acb5-d008-4704-b802-99d0412dab23:1:1
(anonymous) @ blob:http://localhost:4200/5522acb5-d008-4704-b802-99d0412dab23:1
blob:http://localhost:4200/0741dc5a-f771-4b66-91e1-751e6f50f0b2:1 Uncaught DOMException: Failed to execute 'importScripts' on 'WorkerGlobalScope': The script at 'http://localhost:4200/worker-javascript.js' failed to load.
at blob:http://localhost:4200/0741dc5a-f771-4b66-91e1-751e6f50f0b2:1:1
(anonymous) @ blob:http://localhost:4200/0741dc5a-f771-4b66-91e1-751e6f50f0b2:1
blob:http://localhost:4200/bc6ee16c-f739-4a14-90ca-c0745b80ff61:1 Uncaught DOMException: Failed to execute 'importScripts' on 'WorkerGlobalScope': The script at 'http://localhost:4200/worker-javascript.js' failed to load.
at blob:http://localhost:4200/bc6ee16c-f739-4a14-90ca-c0745b80ff61:1:1
You have to add scripts and assests in angular.json to tell webpack to include those kind of resources to get ACE working with Angular
Add the following into your angular.json then try to ng serve again
"assets": [
"src/favicon.ico",
"src/assets",
{ "glob": "worker-javascript.js", "input": "./d /ace-builds/src-min/", "output": "/" },
{ "glob": "worker-css.js", "input": "./node_modules/ace-builds/src-min/", "output": "/" },
{ "glob": "worker-json.js", "input": "./node_modules/ace-builds/src-min/", "output": "/" }
],

"scripts": [
"./node_modules/ace-builds/src-min/ace.js",
"./node_modules/ace-builds/src-min/mode-javascript.js"
]
},

It would be working now! Hope it helps.

How to use ACE in Angular

Google cloud function: express-session generate new session id every request

My application is using ReactJs for frontend and NodeJs + Express for backend API. Everything seem to be fine until I use express-session for application session.

Google Cloud Function is a very good cloud based service for hosting. You can easily deploy your NodeJs app into this platform. But when it is used along with express-session there is a problem. When client send a request to server, the response is returned flawlessly but session id cannot be saved into client cookie. Therefore, all later requests the server treats as from new session.

I was spending hours to find out the solution for this. Some say that when you initialize the session in express app, you have to set cookie secure option to false for non-https. Or in the client side, for every request you have to set credential = “include” option for whatever Ajax calls using ES6 fetch or Axios. Unfortunately all tries with those ways would not be working.

Pasted_Image_9_17_18__5_52_PM.png

Pasted_Image_9_17_18__3_24_PM.png


By the design of Google Cloud Function, __session is the only cookie that you can store. This is necessary for them to be able to efficiently cache content on the CDN. And you have to set Cache-Control Header as private, this is also important.

So in the express application, you many create a session config with the name ‘__session’ as below to get it work

Pasted_Image_9_17_18__1_21_PM.png

Don’t forget to set Cache-Control Header as private

Pasted_Image_9_17_18__1_23_PM.png

So after your first request to server, a cookie for session id with name ‘__session‘ should be stored in your browser cookie.

Pasted_Image_9_17_18__1_32_PM.png

Your cookie for the session is stored correctly on your browser. Now you have to set proper credential option in your request to get the cookie information sent with the request to server side.

You can learn more about request credentials here

All done, your session is now maintained in the server.

Google cloud function: express-session generate new session id every request

How to secure your Redis

A murky day

In a certain day, you receive an email from your Virtual Private Server (VPS) Provider to inform you that your VPS has been compromised. It is certain that your VPS public network will be disabled by the provider. Your sites or apps absolutely cannot be accessed. That is such a bad day.

If your VPS has Redis installed and exposed a port to public network, you will sooner or later receive an email like mine above. You must keep in mind that Redis is designed to be accessed by trusted clients inside trusted environments. This means that usually it is not a good idea to expose the Redis instance directly to the internet or, in general, to an environment where untrusted clients can directly access the Redis TCP port or UNIX socket. In general, Redis is not optimized for maximum security but for maximum performance and simplicity. You can read more about Redis on its official website.

How to secure your Redis

I am writing 5 steps that can help your Redis be secure.

Step 1: Securing the server with iptables

In the step you have to setup a firewall on your server. You can go to this tutorial on digital ocean to know what need to do for a firewall setup.

Once your firewall is ready, you can allow any IPs that you trusted can access to the server so that this can connect to Redis.

Step 2: Binding to localhost

By default, Redis is only accessible from localhost. Make sure this line below exists on your redis configuration file.

$ vi /etc/redis/redis.conf

Make sure this line is uncommented (remove the # if it exists)

Step 3: Configuring a Redis password

Edit your redis configuration file again /etc/redis/redis.conf. Generate your secure password and add into the config under the SECURITY section.

Once your password is setup, you will use AUTH command to make the authentication.

Step 4: Renaming dangerous command

The other security feature built into Redis allows you to rename or completely disable certain commands that are considered dangerous.

Like the binding or setting password into config, disabling or renaming was done by editing your Redis config file under the SECURITY section.

Step 5: Setting data directory ownership and file permission

You can easily check the redis folder permission as typing the command below:

$ ls -l /var/lib | grep redis
drwxr-xr-x 3 redis    redis      4096 Nov 22 03:28 redis

That’s not is the folder’s permissions, which is 755. To ensure that only the Redis user has access to the folder and its contents, change the permission to 700:

$ chmod 700 /var/lib/redis

The other permission you should change is that of the Redis configuration file. By default, it has a file permission of 644 and is owned by root, with secondary ownership by the root group:

$ ls -l /etc/redis/redis.conf
-rw-r--r-- 1 root root 30176 Jan 14 2017 /ect/redis/redis.conf

That permission (644) is world-readable, which is not a good idea. We need to change the ownership and permissions:

$ chown redis:root /etc/redis/redis.conf
$ chmod 600 /etc/redis/redis.conf

Finally, to get your changes effected, you need to restart your Redis:

$ service redis-server restart

Conclusion

No matter which purposes that you are using Redis, always keep in mind Redis is for trusted clients in a trusted environment only. Check your current Redis and follow the above steps for a better secure server.

How to secure your Redis

HOW TO INSTALL XHPROF FOR PROFILING PHP YII 1.X APPLICATION

  1. Introduction
    In software engineering, profiling is a technique used to analyze applications at run-time, in order to identify possible bottlenecks and performance issues within an application. It is an essential resource for software optimization. Profiling differs from benchmarking because it analyzes the application at code level, while benchmarking is intended to analyze the overall application performance as experienced by the end user.

    A profiler is a software that will gather detailed information about the application in order to generate statistics and insightful data about memory usage, frequency and duration of function calls, time to respond to a request, amongst other things.XHProf is a profiler designed to analyze PHP applications. Created and open sourced by Facebook, XHProf works as a passive profiler, which means it will work in the background while having minimum impact on the application’s performance, making it suitable to be used on production environments.
    (copy from digital ocean)

  2. How to install xhprof
    Update the package manager cache with

    sudo apt-get update

    Next, we’ll install pecl with the php-pear package. We’ll also need php5-dev in order to install PHP modules via pecl
    sudo apt-get install php-pear php5-dev

    Install xhprof via pecl

    sudo pecl install xhprof-beta

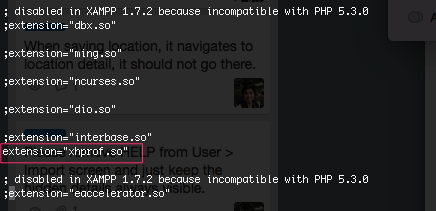
    Edit php.ini file to enable your xhprof extension. Look like the below,
    Pasted_Image_11_15_16__6_13_PM.png
    Restart your php daemon, open your phpinfo to make sure xhprof extension is loaded properly,
    Pasted_Image_11_15_16__6_17_PM.png

  3. How to configure in Yii 1.x application
    Download Yii-xhprof and put into protected/extensions, you will see something like below,
    Pasted_Image_11_15_16__6_28_PM.png
    Make sure this config is in your application configuration,

    'preload' => array(
     'xhprof'
     ),

    and

     'components' => array(
        'xhprof' => array(
            'class' => 'ext.yii-xhprof.XHProfComponent',
            'libPath' => '/full/path/to/xhprof_lib',
            'htmlReportBaseUrl' => 'http://url.path.to/xhprof_html',
     ),),
  4. How to view the result
    Download PHP view and library package here, extract and copy these into your proper place, mine is in the root of application,
    Pasted_Image_11_15_16__10_07_PM.png
    In the xhprof configuration above, configure the libPath point to xhprof_lib folder
    Add virtual host point to xhprof_html in order to view the result. You can use apache or nginx,
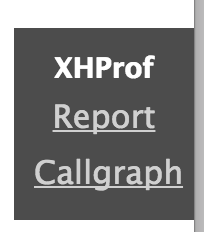
    Yah, all will be done, you should see something like this
    Pasted_Image_11_15_16__10_20_PM.png
    You can click on Report link to see all the calls
  5. How to generate callgraph
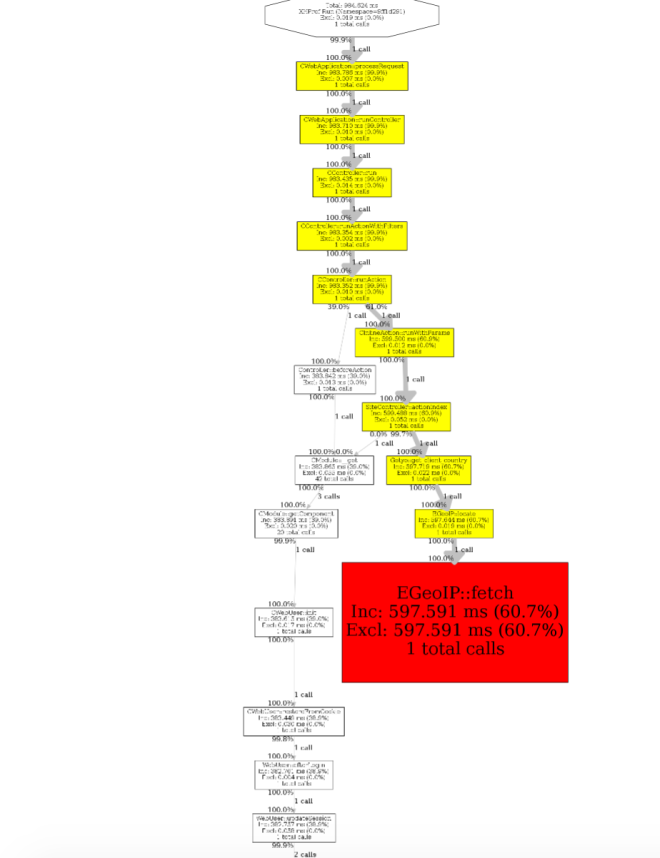
    Click on Callgraph for visualization view, you can see all methods’ calls graphically like below
    Pasted_Image_11_16_16__9_28_PM.png
    Make sure graphziz is installed on your system, if not you may encounter this problem

    failed to execute cmd: " dot -Tpng". stderr: `sh: 1: dot: not found '

    Install graphziz as the command below

    sudo apt-get install graphviz
HOW TO INSTALL XHPROF FOR PROFILING PHP YII 1.X APPLICATION